How to posterize a photo?
Do you want to learn how to give your photos a unique, eye-catching look? Posterizing a photo can be an effective way of jazzing up dull images and adding some visual flair. In this post, we’ll explore the basics of posterization—what it is, what kinds of effects can be created with it, and simple guidelines for how you can use this technique in your own photography!
Choose the right photo – a landscape, portrait, macro or abstract image works well for posterizing
Choosing the perfect photo for posterizing can make all the difference in the impact and visual appeal of your artwork. Whether you’re aiming for a landscape, portrait, macro, or abstract image, each type can lend itself to a unique and stunning outcome in the posterizing process. The key is to select an image that showcases bold, contrasting colors or sharp, defined lines to really make the poster pop. So take your time exploring different options, playing around with color and contrast, and think about what kind of story or feeling you want your poster to convey. With the right photo, the possibilities for posterizing are endless.
Adjust the contrast and saturation of the photo to give it more depth and color
When it comes to photography, tweaking the contrast and saturation can completely transform the look and feel of a photo. Adding depth and color through these adjustments can take a flat and lifeless image and turn it into a vibrant and eye-catching masterpiece. Whether you’re editing a landscape shot to make the colors pop or adjusting a portrait to enhance the subject’s features, the right balance of contrast and saturation can make all the difference. So next time you’re looking to take your photography skills to the next level, don’t underestimate the power of adjusting these two simple settings.
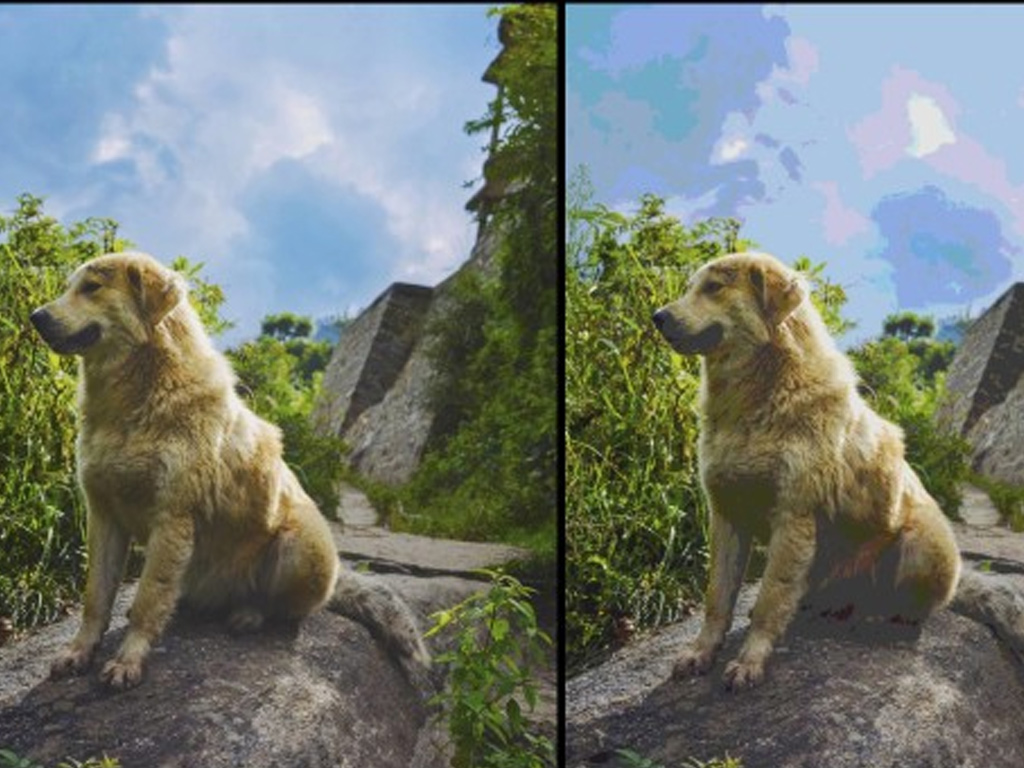
Use a posterizing filter in your editing software to simplify the colors and shapes in the image
Transforming your images with a posterizing filter is a great way to create a visually captivating masterpiece that stands out from the crowd. By simplifying the colors and shapes in your image, you’ll have greater control over the overall tone and mood you want to convey. You can create bold and dramatic images with a few simple clicks of a button. This editing technique is a creative way to add depth and texture to your photos, making them truly one of a kind. Whether you’re a professional photographer or simply enjoy taking pictures in your free time, using a posterizing filter can give your images a stunning makeover that you won’t be able to resist sharing with the world. So why not experiment with this innovative technique and discover a whole new world of possibilities for your photography skills?
Adjust the number of levels in the posterization filter to create more or less dramatic effects
When it comes to creating stunning visuals using the posterization filter, adjusting the number of levels is key to achieving the desired effect. Whether you’re aiming for a subtle or dramatic look, this simple tweak can make all the difference. By reducing the number of levels, you can create a more abstract, stylized feel with bold shapes and simplified colors. Conversely, increasing the levels adds more gradations and detail, resulting in a more photographic look. Experimenting with different levels is a fun and creative way to play with the mood and style of your designs, and can lead to some truly eye-catching results. So go ahead, start playing with those levels and see what kind of visual magic you can create!
Experiment with different filters like dithering and halftone to add texture to your image
Have you ever looked at a photo and thought it was missing something? Adding texture to your image may be just what you need to make it pop. Luckily, experimenting with different filters like dithering and halftone is easier than ever. With just a few clicks, you can add a unique look and feel to your pictures. Dithering creates the illusion of texture by using a pattern of dots, while halftone breaks down the image into smaller dots to add a newspaper-like effect. Give your photos a touch of personality and try out these filters today!
Save your final posterized photo as a high-resolution file for printing or sharing online
Creating a stunning posterized photo can be a great way to add a pop of creativity to your online presence or home decor. However, it’s crucial to make sure your final product is saved as a high-resolution file to achieve the best possible results. Whether you’re planning on printing your photo or sharing it online, a high-res file will ensure it looks sharp and vibrant. Don’t let all your hard work go to waste by settling for a low-quality image. Take the time to save your masterpiece as a high-resolution file and enjoy the stunning results.
To sum up, using posterizing filters can help you to create stunning and attention-grabbing images that are sure to draw viewers’ eyes. With the right photo and a little experimentation, posterizing can transform your digital photos into artistic masterpieces! By following these steps, you can use the posterization filter to give any image contrast and depth or add texture to an existing photo. Additionally, you’ll want to make sure that your final posterized image is saved as a high-resolution file for printing or sharing online. Ultimately, with a little practice and perseverance, anyone can become proficient in creating beautiful posterized imagery!